Tuesday, May 31, 2011

Today I Worked On My "To Do" List

Today I worked on my Pinterest "to do" list.  There are currently SEVENTY-SEVEN things on my list so I figured I'd better get going!!!  (See, after today, my list is at 75!)

Both of the following took, about 10 seconds to make!

On the left of this picture is the picture that was "pinned".  I never could actually find where to buy (not that I would) or how much it cost...but I'm certain it is more than what mine cost me!

  • Rubber band, 
  • ribbon wrapped around 
  • and glued...
  • done. (I held it together with a clothes pin until it dried)


On the next one, I'm fairly certain someone hand made them, but I changed them slightly ... on purpose.  These are made with fabric on colored flat top clips,...fabric just folded over and glued (I'm guessing) 


On mine I used regular large paper clips (cheaper), with ribbon.  
  • I put the two ends of the ribbon together, 
  • ran the loop end into the paper clip then 
  • ran the two ends of ribbon through the loop (sorry, don't know what that's called)... 
  • pulled it tight then 
  • added a dot of glue to the back of the knot.... 

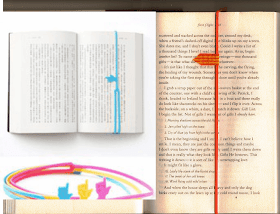
Here they are in action ... This is the Yarn Stash Book I made for my friend.... the way I see it being used.


I also did this today since I'm trying to "draw" something every day now:

I try to remind myself of this fact everyday! 
For more drawings like this please come on over to my doodle blog. (Polly-Wolly Doodle)

Saturday, May 28, 2011

Please help me out...

.
Please help me out... If you have sent me your name and address and you are NOT on the following list, will you please resend it?!

Name ZIP
Bernie 59101
Shannon 22407
Deb 03872
Beverley 72568
Anne 32225
Cara 39553
Teresa 27407
Jess 70726
Kathy 30019
Pam T4T2A2
Ellen 65714
Sarah 70769
Rene 40351

THANKS!

Wednesday, May 25, 2011

First Letter Ideas

.


NOW AVAILABLE FOR PURCHASE AS A TRUE TYPE FONT!    ONLY $10! HERE!


>>>  Do it yourself the easy way, just type!

And, this afternoon I played with some letters...just trying to get a good Uppercase letter...here is what I came up with... different options and of course I can change the "filler" for each depending on what I'm doing because I like some better than others.
.
A couple of weeks ago I did a mailing and used these drawings for the address on the envelopes.  The address was tucked in under the last part of the name.  Some have "flowers", some don't ... I used those where it made some sense to me because of the white space and how far I had already gotten with the name.  If your name is here you are welcome to save it if you want.


edit date 5/28
I now have a version of this font available in True Type Format!  Just type it!


.
WHOOHOO!!!  I am SO EXCITED!  I made my Journaling font into a True Type Font!!!  So I FINALLY have something to sell!  AND anyone can have a fun font!  CHECK IT OUT!!!

Because it is TT you load it onto your PC just like any other font, and use it the same way!  However, there are a few things you need to know... see below


The caps are designed so that the lower case will fit snuggly "in" them, in the middle.  They are NOT created to use "TOGETHER" in a word, some may overlap if you try.  If you have software to move letters around that would work though.

THIS:

NOT This:
But, sometimes you get lucky and they don't look bad together:
All are "see through" so you can make other items appear to be behind the letters. Or, said another way...where you see clear, it is actually transparent

They look really great and somewhat 3D if a shaddow is added either by hand once printed or with a second gray layer of the same text behind the original...slightly offset.

 PLEASE share the link with everyone you think might like it!  I will have to email the file to you so please give me 24 hour turnaround.  I will send ASAP, I promise!  


Today I Made a Yarn Stash Book

.

HUH? What's that you say? Well, I have a friend that knits and yesterday was her birthday soooooo, I decided to make her a book she can track all her yarn in. (no, I'm not worried she will see this, she too busy knitting!)

Outside:

The guy on the bottom is thinking ... "I knew the new guy wasn't gonna fit!"


Inside pages: 

And I found this idea on Pinterest.com.  I thought I could put different colored solid ribbons so she could quickly find the "Reds" or "Yellows" etc.

Speaking of Pinterest.com.  OH MY GOSH!!!  I have found a whole new world!!!  I've known about it for a while but only just last week started using it.  OH MERCY!!!  I have found one of my "happy places!" And I'm having a hard time not just living there!  Come follow me there... click the link below and see what I have pinned already:


Monday, May 23, 2011

DIY Butter Stick

.
A few weeks ago I saw a tutorial on making your own butter stick and thought how GENIUS it was!  Sorry, I can't find it again!  I thought I had it on my "to do" but it isn't there.  But, basically the whole tutorial was on taking an old deodorant container apart and cleaning it well enough that you don't end up eating deodorant.  UGH!!! NOT!!!  First, who can wait that long.  Second, UGH!!

BUT, just think of the uses!  Butter a pan, rolls, corn on the cob, toast.... etc....  

This is my version of it... (Everybody I know is getting one of these babies!)

Pin It
So, I went in search of blanks and found some!  

The fill/refill instructions are on the label so if you give it to someone they can "load" it themselves!

My tutorial: 
  1. Melt about 3/4 stick of butter in microwave.... 
  2. pour into tube .... 
  3. refrigerate!  
  4. DONE!

 
The label is made from a modified graphic from "The Graphics Fairy".  I am also linking there today.

OH!  One more thing... I found this on Pinterest and it so says it all! I laugh every time I read it.


Pin It

Friday, May 20, 2011

Andy Goldsworthy

.

Have you seen this man's work? UNBELIEVABLE!!! "River's and Tides" is a MUST SEE!...it shows him creating some of his work. AMAZING! You really can't appreciate it until you see how he works...baffles my brain!

You can search his name on YouTube and see snippets of the movie... in the meantime....


In this video the red that you see him add to the stream was created from rocks that he found by the stream...he crushed them until he got powder. He only uses what he finds at any given location...he doesn't bring it there.


Wednesday, May 18, 2011

How To Make an Origami Puffy Star

.


Honestly, I have no idea what the name is, I've just seen TONS of them out on the web so I learned how to make them now I want to do a quick "How To" with some of the answers to questions I had when learning.


I plan to show you some uses for them in future blogs so I wanted to go ahead and get the basics down here.


AMAZING!

I have been spending way too much time out on the web...but, I found these and wanted to share. AMAZING!!!


Sunday, May 15, 2011

On Assignment


I have wanted to be able to draw a MALE angel forever! ... because  they are almost never drawn as males and I think they all are... (no mention of female angels anywhere in the Bible...they are all KICK BUTT POWERFUL MEN!)

Anyway, today I did!  This is actually my first ever man of any kind.  I watched a guy on YouTube...Sycra do a "how to" drawing. (you can learn most anything on YouTube!)


And then I worked my PSE magic on it (because when I scanned it I noticed how off his left nostril and eye are)   and got this:  if you notice, the right and left sides are almost identical... I copied the right side and flipped it to make the left ... I erased some things but not all...you can see it mostly in the hair.

And then I tried coloring him.... hummm...not lovin' it anyway but then the scanner made it even worse!!!

Below is a really lousy version of him colored in. (he looks completely different >:-/   shoot!

OK!  If you have any suggestions on how to get a better scan PLEASE tell me!!!  The colors are NOTHING like the actual drawing! This is WAY TOO PINK!  OH WELL!  It was good practice using the Pan Pastels anyway....even if a lot of the shading is lost in the scan.  ARGH!!!
Psalm 91:11-12:
 For he will command his angels concerning you

   to guard you in all your ways;  they will lift you up
in their hands, so that you will not strike your foot
against a stone. 


OH!  One more thing!  I just signed up for a free Online class for PSElements by Kim Klassen.  I'm not too sure what she is teaching but its FREE!  Check it out.


Saturday, May 14, 2011

Taking Advantage of Technology

.


Hi All!  I have been off line all week actually DOing!  I have mentioned wanting to draw in several posts lately and this week I did just that.  Unfortunately, nothing is at that "I'm DONE! Finished" place... everything is a piece of something or "I just want to do one more thing to it" stage.  And as I was trying to go to sleep I realized that if I don't post something it could be months before I "finish" something!  Not good.


That, and I really do want to document the process...so tonight I start the documenting of the process.


Here are some of the things I did this week:


This is the scan of the original pencil drawing I did with a regular pencil on cardstock


I liked her, but I needed to add color, and I wanted to do several versions of her to see what I like best, then I'll redraw an original drawing of the one (or more) that I like best ....  SO, I scanned her, whited out the eyes (because the scan was TERRIBLE and the eyes were just black dots ...look at it again...UGH!  So, I white out the eyes and print 4 of her on a piece of cardstock.


And here ya go... her done three different ways:

I'm still not done, I think I like the green one with the word "Why" ... doesn't it look like that's what she thinking?  And there could be many reasons she is asking "Why?" ... "Why did I get cancer?"  "Why did he leave me?"  Whatever... it is just a sad "Why?"

but I moved on to other drawings...I'll get back to her....


Again, here ya go...a TERRIBLE scan (gotta learn what I'm doing wrong!):


modified for printing:

and with some color added:


I will add more color later...She's not there yet... I do like her like this but I want to see what she will look like in full color.


I did these two with a plan to add words ... once I get happy with them.  They are my two little "Bee" attitudes.  I actually did them separately then used PSE to overlap them (that's how I was able to do the transparent wings on the front one).  I practiced with both having black faces and both with yellow... I'm liking the mix of the two.
And then Thursday I got my Pan Pastels!!!  OH MY GOSH!!!  I AM IN LOVE!!!  I also got a little 3.5 x 5 watercolor pad so I decided to just jump right in and not worry about messing up, just go for it!  


Here is what I have done so far:


quick watercolor flower...the border is the PPastels!  AMAZING STUFF... you put it on with a makeup sponge (or the thing that looks like a makeup sponge)  swish/ swish and you are done!!!


 And here I was messing with color combinations and possible future borders ... and, I wondered if I could draw AFTER I put the Pan Pastels down...yes... I colored the stripe first then did the flowers on the right side of the page:

And just another watercolor with the borders done with PP

I did the two watercolors after I saw a class being offered by Martha Lever .  I wanted to see if I could do them without the class.  It costs $30 so I am still debating.... tools or class??? or GAS for that matter!  OH MY GOSH!  When will it stop going up?!

Anyway, THAT's where I have been this week!  I have been coloring :-)  I did do some other stuff but it is downstairs in another book... I'll show you that later.


OH!  And welcome to my new followers!  I got a few this week.  I OWE you your "gift"... I know.... I actually did one this afternoon and my computer CRASHED just as I was exporting the file and I lost every bit of work....so, I did what comes naturally and said.... SHOOOOOT!  I'm going to get something to eat! ..... and I did.


Monday, May 9, 2011

FREE Online Art Journal Workshops!

Hi All,


It is 2:55 AM here right now and I have GOT to get to bed!  But, before I go I wanted to share something I just found.


First ....  If you have been around for long you have probably noticed that I LOVE LEARNING!  Well...suddenly this past week I decided I want to create art.  Unfortunately, I only have limited natural abilities ... BUT, from what I can see, the whole "art journal/collage, word art" kind of art doesn't require the talent I lack... it lets a "non-drawing" artist like me, not be perfect,  which is one of my hangups... I am very self critical and this style frees you from that.... so, I want that freedom!


Well.... I spent all afternoon Sunday blog hopping and finding folks whose work I love and finding classes they teach. Problem is, most of the classes costs... $35 - $150!  OUCH!  That is not normally a problem, but I struggle with spending on classes vs. buying more of the materials necessary for the classes!  It is AMAZING the "stuff" you want to buy when you want to do a simple art journal!  They all say, "use what you have" right after they show you something new and different! 
 ...

Like Pan Pastels! (new for me anyway)  Never heard of such and and now I want all the colors they sell! 
Yup! want those!  but, maybe I'll start small with a 10 or 20 piece set... either way, that plus class costs!  OUCH!  Here are the two people that convinced me I "need" them! Pam Carriker (this is a free video to watch her using them to create a female head in 10 minutes) and Teesha Moore uses them to deepen the edges of the inside area of a border. (I watched her whole series on creating two journal pages)


ANYWAY!!! I wanted to show you what I discovered!  Three FREE, Online, Multi-Week classes offered by Strathmore


I went ahead and signed up for all three classes and started watching tonight.  Awesome! And FREE!

They aren't exactly the classes that I wanted ... I wanted lettering and watercolor flowers but, these are getting my "learning itch" scratched! 


And now its 3:45!  SHOOT!  Gotta go give sleep another try...night all.

Saturday, May 7, 2011

Altoid Can and Bottle Cap Makeovers

.
Last weekend I finally decided to start on my "To Do" list... see above menu.  I had a couple of links to pin cushions that I thought were cute and I was doing the whole "clean the coffee table thing" (that never actually happened) so I took what I had sitting around and made these:


There are a few differences in mine and the other ladies'.  I am all about "GET IT DONE QUICK" so I used ribbon to wrap around the tops and a lot of the "dots" on each are actually the pins.  I also added a little piece of metal (could be a washer...mine wasn't, but could be...I used flattened button parts) inside between the cover and the cap so that I could then put a magnet anywhere, like on my sewing machine and I could then put my pin cushion on the magnet and it would stay ... or be moved.


When I ran out of bottle tops I went around the house looking for other tops I could use.  I didn't find any other unused caps but I did find TONS of these brown containers that I never figured a use for...so here ya go...larger pin cushions.


THEN, yesterday a friend sent me a text message asking if I wanted some old Altoid tins she had been saving... HECK YES! (THANKS Jodie!) So this morning I made this set:


I have actually listed a KIT to make this in my Etsy store and at my new Store Website.  The kit will include downloadable patterns and video tutorials (I think...I'm thinking that is video is easier to understand than just pictures ??? please let me know if you disagree!)


OH!  Just FYI, the kit is 60% off on my website!  Just a little bonus for reading this far :-).