.
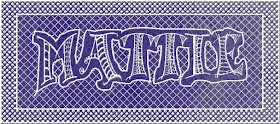
Don't you just LOVE TO DISCOVER!!! I sure do. I sit here at my PC most of the day and just try things to see what they will do and this is what I came up with today... I think it looks like machine lace embroidery, all done on the PC.
I started with this in CorelDraw:
- 1. Typed the name (I'm sure you recognize my MFC Polly-Wolly Doodle Font, since I try to do something different with it every other week!)
- 2. I then drew a hand frame around the name and filled that shape with white... IMPORTANT, it has to be a single fillable area in order to block out the patterned background behind it.
- 3. I then put two filled rectangles behind the above. (I actually thought about print it out and hand drawing a zentangle type filler but you know I'm all about speed and I didn't want to wait that long to see how the finished product would look.)
In PSE:
- 4. I copied the above and pasted it into PSE
- 5. Erased out all the white to make that transparent
- 6. Made all the black white
- 7. Used one of the emboss tools on that layer
- 8 Added the background layer
- 9 DONE!
After I had played around with it for a long time and figured out the process I was able to do this design in about 15 minutes. The freehand outline took most of the time because it wasn't all connected so I was unable to fill it until I got it connected.

I know that a lot of folks like this font, because they have pinned in on pinterest in order to try and hand draw it themselves later...but this is a prime example of why having the TTF version of it is nice....makes for quick work! I can now do any name in about 15 minutes... it would take FOREVER to hand draw each letter every time you wanted to create something like this! OU! I feel a Merry Christmas coming up! (hee hee)
OK! WOW! I just did it again and chose a different embossing tool and now it looks more like plastic...hummmmm So you have to play with it, I don't know how to tell you which I use for which!
And here it is again, with a whole different look! I chose the gold embossed looking button and then embossed it again to get this. ...


Preciosas letras!
ReplyDeleteThis is lovely, Nancy. Your font would look wonderful in real embroidery, too. Don't those fancy sewing machines do that?
ReplyDeleteOh, and I found this, using recycled bottles and thought you might be interested. The pumpkin shape is really getting my attention. it's here at http://craftberrybush.blogspot.com/2011/09/wise-owl-recyclesmy-thoughts-on.html
Hugs and I hope the weather where you are is as nice as it is here.
Beverley
Ou! Sorry for the delayed response! I haven't been paying very close attention lately. I've been out "doing" and not sitting so much lately. I have a friend moving in a couple of weeks so I have been helping her with garage sales and such.
ReplyDeleteThanks Pitavola!
And Beverly, thanks, you are right, it would probably would look great in real embroidery. I actually have a couple of those fancy machines. Thing is, the software automatically generates its own stitches and "holes" causes it to do some freaky stuff! For some reason it stitches in all kinds of directions and it really isn't pretty. And, it puts in a lot of "start/stops" so I'm afraid to even try the uppercase!! I tried just doing the lower case letters which only has a few dots (holes) it went WACKY!! I ended up having to a lot of manual manipulation to make it look right! UGH!
OH! and thanks for the link! How cool is that owl!?!
You know you can add it to the list too right? Just click on the "Click here to enter" at the bottom. I don't think the owner would mind since it links back to their site. I'm gonna link it now