.
And all it took was one 10 minute phone call!
I got my car insurance bill in the mail today and wanted to cry at the cost! COME ON PEOPLE!!! And it suddenly occurred to me that I needed to call my insurance guy and try and see if there wasn't something that could be done.
I remembered that every time you get car insurance they ask how far you drive on average to work. Well, I haven't worked in almost two years so I bet I haven't put 1500 miles on my car total this last two years! Sure enough, they changed my car to "recreational" saving me about $130 a year. (about 10%) My agent seemed pretty happy about that but I wasn't so I kept after him to find something else. And here is the secret... "I DIDN'T KNOW THAT!" tidbit he told me..... If you take a defensive driving class and get certified you get a discount! Mine will be $88 less a year...not huge but over time.... It is only good for three years then you have to do it again but easy enough, because you can do it ONLINE...its a SIX HOUR CLASS!!! Yes, it costs about $35 but not a bad investment to save $88x3 ($264)! So, now I have saved over $200 a year.
I then asked him about my home owners and found out that if I went to $1000 deductible instead of $500 I would save $280 a year! You make the difference up in 2 years! Hellooooo....I haven't filed a claim in 12 years! I sure could have used that $3360!
So, by the end of the 10 minute call I had saved over $500 a year AND I have a check coming for $280 since it was just paid by my escrow. Hee Hee!
Take that defensive drivers class!

My Legacy ... leg-a-cy [leg-uh-see] noun: anything handed down from the past, as from an ancestor or predecessor
Friday, September 23, 2011


Wednesday, September 21, 2011
How to Create Your Own Color Swatches From Photos
.
I can not tell you how long I have wanted to be able to create those pretty swatches from photos that I see lots of folks do out on the web. I don't know why I like them, I just do.

I have asked lots of folks and couldn't get an answer... OH! A friend did recommend a couple of sites that automatically generates them, but one didn't let you save the .jpg and the other chooses the colors for display, you can't do a thing to control it. URGH!
WELL! Today I had a SUDDENLY! You know I get those all the time and each time I go "WELL DUH! Why is that JUST coming to me?!"
All I needed to do is create a PSE template! You know, the kind that people create for sale on Two Peas for Digital Scrapbooking?
And then began the TOTALLY worthless search for "How to Create A Template in PSE"!!! Good luck finding that! Everyone wants to tell you how to use one, but no one teaches how to create one. And I may as well admit here and now that I am NOT a lover of PSE! I have used CorelDraw and CorelPaint for about 20 years and I can pretty much make it do what I want, but PSE is a MAJOR PAIN! Nothing is intuitive! You can do anything as long as you know the 4 keys to hold down and which foot to stand on! I just spent 11 hours yesterday trying to get a friend comfortable enough with it to be able to create Christmas cards from photos and I left there every bit as confused as she was because we worked on TWO of her PCs and PSE works TOTALLY DIFFERENTLY on both of hers and mine...they are all different! HORRIBLE!
And then began the TOTALLY worthless search for "How to Create A Template in PSE"!!! Good luck finding that! Everyone wants to tell you how to use one, but no one teaches how to create one. And I may as well admit here and now that I am NOT a lover of PSE! I have used CorelDraw and CorelPaint for about 20 years and I can pretty much make it do what I want, but PSE is a MAJOR PAIN! Nothing is intuitive! You can do anything as long as you know the 4 keys to hold down and which foot to stand on! I just spent 11 hours yesterday trying to get a friend comfortable enough with it to be able to create Christmas cards from photos and I left there every bit as confused as she was because we worked on TWO of her PCs and PSE works TOTALLY DIFFERENTLY on both of hers and mine...they are all different! HORRIBLE!
OK! OK! Sorry, just had to get that off my chest!
But, I say all that to say, if I try to give any instructions on "How To" here, they may be completely worthless on a different PC! so there is very little point! I will try and show you what I came up with and hopefully you are more PSE savvy and can figure out HOW to do it!
Here is my pitiful shot at it:
1. I put the blocks (or drawn rectangles) where I wanted them, each on a separate layer. (I saved this on my desktop for future use)

GET THE PICTURE YOU WANT TO USE.
2. Open then Drag your picture into the screen (it will be on its own layer)
3. Drag that picture layer above the "Photo" layer
4. While it is still active go to Layer/Create Clipping Mask (this will put your picture "inside the frame" where you can resize it, or move it around to where you want it. You can see in the picture below that the actual picture is much larger than the block I want it in) .... IT TOOK ME ALL DAY to figure this step out!!!

CHOOSING AND ADDING THE COLOR BLOCKS
5. Use your eyedrop tool to select the color you want ....that will put in the "fill" box...bottom left corner. (circled below)
6. Activate the first block you want to fill and using the paint bucket fill that block with color. (repeat for all color blocks)
ADDING THE COLOR NUMBER
If you decide you want to include the number for each color like I did below...
7. Click on the "fill block" in the lower left corner it will pull up this screen and you will see the color's number...select that and copy it
8. Paste the number over the color it represents.
9. DONE!!! HALLELUJAH!!! PRAISE THE LORD!!!
OH! One last step, export it as a .jpg. :-)


Now that I know how, I wonder if I will ever do it again?! :-)

You are more than welcome to use my pitiful attempt if you want... Download it HERE
PS... if there is an easier way, PLEASE SHARE!

Monday, September 19, 2011
Auto Tunes
.
This is a video I just found on my Facebook. He is the pastor of the church I served at for 10 years, a while back. He actually does sing, and write songs but honestly, I like this better than anything I've ever heard him do! I just love it! Someone in the media department took phrases from some of his sermons and used Auto Tunes to create this "rap" song. SO CLEVER! Not something I will ever use, but I'm impressed at its usage! Kudos to the media guys!
This is a video I just found on my Facebook. He is the pastor of the church I served at for 10 years, a while back. He actually does sing, and write songs but honestly, I like this better than anything I've ever heard him do! I just love it! Someone in the media department took phrases from some of his sermons and used Auto Tunes to create this "rap" song. SO CLEVER! Not something I will ever use, but I'm impressed at its usage! Kudos to the media guys!
Wednesday, September 14, 2011
New Font Super Charged!
Monday I made this True Type Font:

But, like every font on the market, you can only change the color of the "BLACK" areas...anything white stays white. You have to print and color by hand...not a bad thing, but I like to mass produce so I need QUICK!
Tuesday (last night, ALL NIGHT) I played around to see if I could do something that I wish I could do with every font...have more than one fill color + an outline color. So, I started with this... now I can make the A a color, OR a colored fill pattern

Because all the letters in this font are UPPERCASE, I decided to use the lowercase to color the dots... so now if I type the 'A' in one color UPPERCASE and the lowercase 'a' in another color I get this! everything is automatically lined up, no adjusting necessary!

Then, because the frame is the same on every letter, I decided to use the { left bracket to fill the the background and got this...

And here I used a pattern filled/color background

More Play....


Now I can cut them apart and make note cards/tags,whatever,out of them...I can even make embroidery and vinyl patterns out of them!

Monday, September 12, 2011
A New True Type Font:
- What I did today.... made a new font.

and then I played....it is SOOOO MUCH easier when you don't have to start with a blank page!


Saturday, September 10, 2011
Today Was A PERFECT Day!
Last week I had a idea. Several of us usually get together to "catch up" but it usually involves going to a restaurant or the movie... so, that's a guaranteed $10 minimum expenditure. Well, I live about 10 miles from a lake so I mentioned everyone bringing a picnic lunch and finding a table at the lake. I've actually never done that, even though it is so close so I had no idea where to go...until today. A couple of us went in search of a spot and found it, right off the road, a huge picnic table and tons of shade. PERFECT WEATHER today! We didn't save any money because it was a "suddenly" decision and we ended up stopping at Firehouse Grill for a sandwich. (over $10 thank you very much!... SHOOT!) But, now we know, where to go for the next time.


After we left there the other girl knew about an "event" they are having at Kennesaw Mountain (a national battlefield park ...also about 10 miles from my house) The Kawanians are sponsoring a flag flying week to commemorate 9/11... a flag for each person that died that day.

REMEMBERING 9/11
From Kennesaw Mountain Website (Field of Flags):
Join us as we commemorate the tenth anniversary of September 11, 2001 with our third Field of Flags installation. One of the largest commemorative events in the nation, a flag will be placed in Kennesaw Mountain National Battlefield Park for each life lost on 9/11. The flags will fly Saturday, September 10th through Friday, September 16th.
|


Friday, September 2, 2011
Wednesday, August 31, 2011
The Evolution of an Idea
.
Back in March my niece asked me to write something for her blog... I WAS CLUELESS, but I had a SUDDENLY.... I mentioned it here, but I doubt many folks actually went to see what I said so I figure I can load it up here for today. If you have already seen this, just ignore
..............................
We'll call this... "The Evolution of An Idea" ... because this really is how I get most of my ideas!...and why I think its silly to have a clean house!
And it all started with this....

Yup, that's right, I dropped the whole thing on the floor! OH JOY! Yet another mess that needs cleaning up! As I was sweeping and about to dump it in the trash I had the thought... "WAIT, you can use it in a can to hold up pencils!" So I grabbed the ever-ready can and filled it up.

I looked at it and just had a "ho-hum" feeling about it at which point I looked down and saw a jar ....
And EUREKA! My idea was born! I would make a "Hidden Treasure Container!" Cool!
To work!
I've never made one, or seen one made so it took 3 times videoing the steps because I was just "winging it".
Here is what we will be making:

A place to hide your treasures!

(Important note! REMEMBER where you hide it!!! I honestly lost all of my diamond jewelry for TWELVE years by hiding it when we went on vacation! It took a fire gutting my house and the Holy Spirit directing my steps to find it! Talk about a God story! I'll have to write about that on my other blog: Life Lessons)
Anyway, anyway...seeeeee.... FOCUS!
What you will need:

- A Jar
- Popcorn or Beans or Rice
- A container that will fit inside your jar (I used a Dr Pepper can)..it could be a paper/plastic cup, a toilet paper roll, whatever.
- Glue
- Scissors (NOT your momma's fabric scissors!!!)
- A label (Included as a FREEBIE! click HERE)
- Something to pour with
- Something pointed if you are using a can (missing from picture)
Now, go make you some popcorn, grab a Dr Pepper .... sit back and relax ... I'll do the work for you now...
Enjoy the show!
Enjoy the show!
What I did next, after my battery died, was add a few more kernels in the wet glue..so that even if it turns over nothing but the treasure is going to fall out.

OH! And I added the label... I printed mine on 8.5" x 11" label paper, but you can print on regular paper and use your favorite glue to glue it down.
Lessons learned....(and the reason I had to tape 3 times):
Lessons learned....(and the reason I had to tape 3 times):
- The first time I opened a can that I had not washed out as soon as I finished drinking it...you can't tell that until you have cut the can open, so be sure and wash your can out ASAP if you think you may use it. (I have a few more ideas for drink cans coming up so you may want to start your collection now.) Yes, you can wash it after its open but there is a little groove in the bottom that catches all the sticky, that groove is hard to get that clean, especially with the sharp edges of the cut can.
- The second time I had to stop because I had not made the can short enough...That's what happens when you don't measure first. You want the can to be just below the neck of the jar.
OK then, I hope you enjoyed watching me learn and an idea evolve. That was fun!
PS. A PLASTIC Dr. Pepper bottle would have been A LOT easier and I could have put it on the Recycle blog!

PS. A PLASTIC Dr. Pepper bottle would have been A LOT easier and I could have put it on the Recycle blog!

Tuesday, August 30, 2011
And They're Baaaaaack.....
.

And, if that writing on the bottom of the bulb and top of the bottle top bothers you as much as it does me.... then I have a little tip for ya!

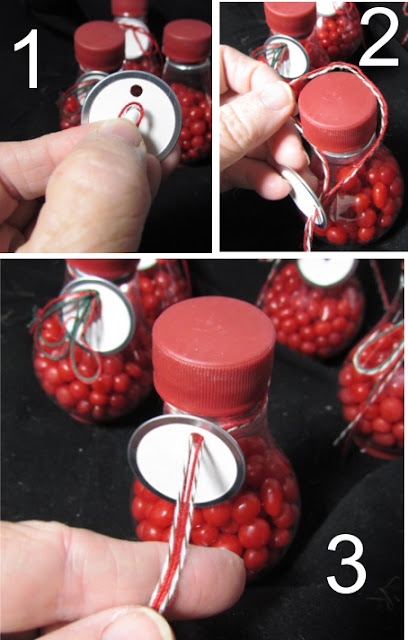

That's right, but this time they are disguised as "CANDY BULBS"!!!
Cleaned Out Light bulb + Dr. Pepper Bottle Cap = Candy Bulbs

All ready for the quick gift in need!
Check out the top, YUP, our trusty ole Dr. Pepper Top! YES it does screw on! HA!!

Drum rooooooollllllll......
I LOVE THE MAGIC ERASER!!! Takes that print right off :-)
And the tag is probably self explanatory but here are some shots anyway...
1. Cut thread, fold in half and put the loop through the hole
2. Slip the loop over the cap
3. Pull it tight and tie a bow

Make a good supply of them and have the ready to grab as you run out the door to lunch with a friend..... for the friend and/or the server. I actually thought about having some ready with a dollar bill rolled up inside a clear straw and stuck down inside with the candy :-)... but I'm not so certain they would love just one dollar and I don't have a surplus of more just lying around waiting to be given out! That's what cash cards are for.
If you missed my first post on using a cleaned out light bulb, that is HERE.

Monday, August 29, 2011
The Rest of the Story...
.

Last week you guys helped me
out with what to do about my
friend's sweatshirt.... this is what
I ended up doing with it...
because I had to agree with Pat,
I wouldn't want someone staring at it long enough to figure out what it said! I THOUGHT the color I was using was more gray than blue, but up against the gray it looks totally blue!


Think early Christmas shopping
Email me, at nancy@myfathershands.com
or I'm gonna add it to my store in a minute.

And, one more thing, you know I never go to lunch with a friend empty handed so when my model and I decided to go eat I threw some vinyl polka dots on my bulb and tied an already made heart string and was ready to roll in 5 minutes! Gotta love having all the parts made ready for throw together :-) The hearts helped make the red bottom make sense.
Subscribe to:
Posts (Atom)


