Wednesday, September 28, 2011

How to Make Faux Embroidery with a PC!

.
Don't you just LOVE TO DISCOVER!!!  I sure do.  I sit here at my PC most of the day and just try things to see what they will do and this is what I came up with today...  I think it looks like machine lace embroidery, all done on the PC.


I started with this in CorelDraw:


  • 1. Typed the name (I'm sure you recognize my MFC Polly-Wolly Doodle Font, since I try to do something different with it every other week!)
  • 2. I then drew a hand frame around the name and filled that shape with white... IMPORTANT, it has to be a single fillable area in order to block out the patterned background behind it.
  • 3. I then put two filled rectangles behind the above.   (I actually thought about print it out and hand drawing a zentangle type filler but you know I'm all about speed and I didn't want to wait that long to see how the finished product would look.)


In PSE:


  • 4. I copied the above and pasted it into PSE
  • 5. Erased out all the white to make that transparent
  • 6. Made all the black white
  • 7. Used one of the emboss tools on that layer
  • 8  Added the background layer
  • 9 DONE!


After I had played around with it for a long time and figured out the process I was able to do this design in about 15 minutes.  The freehand outline took most of the time because it wasn't all connected so I was unable to fill it until I got it connected.
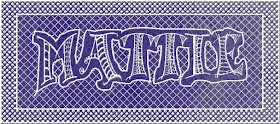


I know that a lot of folks like this font, because they have pinned in on pinterest in order to try and hand draw it themselves later...but this is a prime example of why having the TTF version of it is nice....makes for quick work!  I can now do any name in about 15 minutes... it would take FOREVER to hand draw each letter every time you wanted to create something like this!  OU!  I feel a Merry Christmas coming up! (hee hee)


OK!  WOW!  I just did it again and chose a different embossing tool and now it looks more like plastic...hummmmm  So you have to play with it, I don't know how to tell you which I use for which!


And here it is again, with a whole different look!  I chose the gold embossed looking button and then embossed it again to get this.  ... 

OK, this is really cool to play with!


Friday, September 23, 2011

Today I Saved $500+ Each Year in Insurance!

.
And all it took was one 10 minute phone call!

I got my car insurance bill in the mail today and wanted to cry at the cost!  COME ON PEOPLE!!!  And it suddenly occurred to me that I needed to call my insurance guy and try and see if there wasn't something that could be done.

I remembered that every time you get car insurance they ask how far you drive on average to work.  Well, I haven't worked in almost two years so I bet I haven't put 1500 miles on my car total this last two years!  Sure enough, they changed my car to "recreational" saving me about $130 a year. (about 10%)  My agent seemed pretty happy about that but I wasn't so I kept after him to find something else.  And here is the secret... "I DIDN'T KNOW THAT!" tidbit he told me..... If you take a defensive driving class and get certified you get a discount!  Mine will be $88 less a year...not huge but over time.... It is only good for three years then you have to do it again but easy enough, because you can do it ONLINE...its a SIX HOUR CLASS!!!  Yes, it costs about $35 but not a bad investment to save $88x3 ($264)!  So, now I have saved over $200 a year.

I then asked him about my home owners and found out that if I went to $1000 deductible instead of $500 I would save $280 a year!  You make the difference up in 2 years!  Hellooooo....I haven't filed a claim in 12 years!  I sure could have used that $3360!

So, by the end of the 10 minute call I had saved over $500 a year AND I have a check coming for $280 since it was just paid by my escrow.  Hee Hee!

Take that defensive drivers class!

Wednesday, September 21, 2011

How to Create Your Own Color Swatches From Photos

.

I can not tell you how long I have wanted to be able to create those pretty swatches from photos that I see lots of folks do out on the web. I don't know why I like them, I just do.  


I have asked lots of folks and couldn't get an answer... OH! A friend did recommend a couple of sites that automatically generates them, but one didn't let you save the .jpg and the other chooses the colors for display, you can't do a thing to control it. URGH!

WELL!  Today I had a SUDDENLY!  You know I get those all the time and each time I go "WELL DUH! Why is that JUST coming to me?!"

All I needed to do is create a PSE template!  You know, the kind that people create for sale on Two Peas for Digital Scrapbooking?  


 And then began the TOTALLY worthless search for "How to Create A Template in PSE"!!!  Good luck finding that!  Everyone wants to tell you how to use one, but no one teaches how to create one.  And I may as well admit here and now that I am NOT a lover of PSE!  I have used CorelDraw and CorelPaint for about 20 years and I can pretty much make it do what I want, but PSE is a MAJOR PAIN!  Nothing is intuitive!  You can do anything as long as you know the 4 keys to hold down and which foot to stand on!  I just spent 11 hours yesterday trying to get a friend comfortable enough with it to be able to create Christmas cards from photos and I left there every bit as confused as she was because we worked on TWO of her PCs and PSE works TOTALLY DIFFERENTLY on both of hers and mine...they are all different!  HORRIBLE!

OK! OK!  Sorry, just had to get that off my chest!

But, I say all that to say, if I try to give any instructions on "How To" here, they may be completely worthless on a different PC! so there is very little point!  I will try and show you what I came up with and hopefully you are more PSE savvy  and can figure out HOW to do it!

Here is my pitiful shot at it:

1.  I put the blocks (or drawn rectangles) where I wanted them, each on a separate layer.  (I saved this on my desktop for future use)


GET THE PICTURE YOU WANT TO USE.
2. Open then Drag your picture into the screen (it will be on its own layer)  
3. Drag that picture layer above the "Photo" layer
4. While it is still active go to Layer/Create Clipping Mask (this will put your picture "inside the frame" where you can resize it, or move it around to where you want it. You can see in the picture below that the actual picture is much larger than the block I want it in)  .... IT TOOK ME ALL DAY to figure this step out!!! 


CHOOSING AND ADDING THE COLOR BLOCKS


5. Use your eyedrop tool to select the color you want ....that will put in the "fill" box...bottom left corner. (circled below)
6. Activate the first block you want to fill and using the paint bucket fill that block with color. (repeat for all color blocks)

ADDING THE COLOR NUMBER
If you decide you want to include the number for each color like I did below... 
7. Click on the "fill block" in the lower left corner it will pull up this screen and you will see the color's number...select that and copy it
8. Paste the number over the color it represents.
9. DONE!!!   HALLELUJAH!!! PRAISE THE LORD!!!  

OH!  One last step, export it as a .jpg. :-)


Now that I know how, I wonder if I will ever do it again?! :-)


You are more than welcome to use my pitiful attempt if you want... Download it  HERE

PS... if there is an easier way, PLEASE SHARE!


Monday, September 19, 2011

Auto Tunes

.
This is a video I just found on my Facebook.  He is the pastor of the church I served at for 10 years, a while back.  He actually does sing, and write songs but honestly, I like this better than anything I've ever heard him do!  I just love it!  Someone in the media department took phrases from some of his sermons and used Auto Tunes to create this "rap" song.   SO CLEVER!  Not something I will ever use, but I'm impressed at its usage!  Kudos to the media guys!


Wednesday, September 14, 2011

New Font Super Charged!


Monday I made this True Type Font:


But, like every font on the market, you can only change the color of the "BLACK" areas...anything white stays white.  You have to print and color by hand...not a bad thing, but I like to mass produce so I need QUICK!


Tuesday (last night, ALL NIGHT) I played around to see if I could do something that I wish I could do with every font...have more than one fill color + an outline color.  So, I started with this... now I can make the A a color, OR a colored fill pattern


Because all the letters in this font are UPPERCASE, I decided to use the lowercase to color the dots... so now if I type the 'A' in one color UPPERCASE and the lowercase 'a' in another color I get this! everything is automatically lined up, no adjusting necessary!


Then, because the frame is the same on every letter, I decided to use the { left bracket to fill the the background and got this...


And here I used a pattern filled/color background 


More Play....


Now I can cut them apart and make note cards/tags,whatever,out of them...I can even make embroidery and vinyl patterns out of them!


Monday, September 12, 2011

A New True Type Font:


  • What I did today.... made a new font.
ONLY $5 HERE


and then I played....it is SOOOO MUCH easier when you don't have to start with a blank page!


Saturday, September 10, 2011

Today Was A PERFECT Day!

Last week I had a idea.  Several of us usually get together to "catch up" but it usually involves going to a restaurant or the movie... so, that's a guaranteed $10 minimum expenditure.  Well, I live about 10 miles from a lake so I mentioned everyone bringing a picnic lunch and finding a table at the lake.  I've actually never done that, even though it is so close so I had no idea where to go...until today.  A couple of us went in search of a spot and found it, right off the road, a huge picnic table and tons of shade.  PERFECT WEATHER today!  We didn't save any money because it was a "suddenly" decision and we ended up stopping at Firehouse Grill for a sandwich. (over $10 thank you very much!... SHOOT!)  But, now we know, where to go for the next time.


After we left there the other girl knew about an "event" they are having at Kennesaw Mountain (a national battlefield park ...also about 10 miles from my house)  The Kawanians are sponsoring a flag flying week to commemorate 9/11... a flag for each person that died that day.  


REMEMBERING 9/11


From Kennesaw Mountain Website (Field of Flags):


Join us as we commemorate the tenth anniversary of September 11, 2001 with our third Field of Flags installation. One of the largest commemorative events in the nation, a flag will be placed in Kennesaw Mountain National Battlefield Park for each life lost on 9/11. The flags will fly Saturday, September 10th through Friday, September 16th.


The Marietta Kiwanians invite citizens to participate in the 
Field of Flags by sponsoring a commemorative flag. 
For $20, the sponsor will receive a flag measuring 3’x5’, 
along with a Certificate of Sponsorship. The funds 
collected from this event go to the Club’s Foundation, 
and will support scholarships and other community 
and youth services in the area.
At the conclusion of the Field of Flags installation, 
sponsored flags will be available for pick up.


Friday, September 2, 2011