I am so sorry for the TERRIBLE layout of this blog! It was actually pretty nice but one day everything went all amuck ??? No clue what happened....and since I don't really post here anymore I haven't bothered to figure it out. SORRY!!!

Monday, July 25, 2011

How to Make a Roll of Faux Washi Tape

.
AND another idea for recycling a plastic bottle!

I have already done a How To Make Faux Japanese Tape but this is a little different.  This time we are going to put it on a roll like a roll of tape.

Last night I had to make some labels for a large project I was working on but I only needed a page and a half of label paper...CRINNNNGE... You know how I hate to waste anything, especially label paper!!!  So, I decided I would test an "I Wonder If" idea I had.

So, I started with the half sheet of labels and added an old sheet music graphic from  "The Graphics Fairy"


Tools needed for the rest:

Plastic bottle
tape
paper cutter
scissors
label sheet
tape dispenser (optional)... this is a "Tim Holtz" one

To make the core...
cut a .75"x 3" (approx....I didn't really measure) strip of the plastic bottle and 

add a piece of tape to the end.

Now wrap the plastic around the part of the dispenser where a roll of tape would go....start with the end without the tape... the tape will be used to finish the roll....or to tape that end down. ... if you don't have a dispenser just make a roll or cylinder.

Close off end with the tape that is already in place
DONE!  You now have the core of the roll of "tape"

Cut the label sheet into  .75" x 11" strips
Start to roll the "tape" around the core, removing the backing as you go.

You can continue rolling all the strips onto the roll until you have rolled them all on. I know, I know...I wish it could be a continuous roll too...but....ya know... there has to be some compromising done when you try to save money.

Here it is loaded onto the dispenser ready for use.

And I grabbed the first thing I could find to show what the tape actually looks like on something: 

Now, I never have to worry about wasting good label paper again!  I'll just make a roll of "washi" tape!...in different  designs and colors!  

The roll just slides off and you can change them out.... OR, don't use the dispenser thingy at all, that's a $5 unnecessary expense.

Disclaimer:
- I don't know if, over time, the sticky side will pull the ink from the layer below... it did NOT do it during my test time, but I don't know.  Of course, to avoid that problem, don't peel the backing off, just roll it up (but you have to deal with always sticking the end down when you are finished using it)

Don't forget to check out my "How to Recycle a Plastic Bottle" 
Linky Party to see more ideas... and PLEASE, add your own!


Thursday, July 21, 2011

How to Recycle a Plastic Bottle (Part 3)

.
This time I made bangle bracelets from "rings" cut from the middle of the Dr Pepper bottle.  


SIMPLE! SIMPLE! QUICK! QUICK!  Have a set of bracelets to match any and every outfit for just pennies!!

Supplies: 
  • plastic bottle
  • string of cheap "pearls" found at any craft/fabric store
  • Embroidery thread (I used the thick, 1 strand crewel thread)
  • scissors
  • tape 
1. Cut a thin strip...about 3/8" from the middle of the bottle (around the bottle, not up and down, take advantage of the curve)  The first few I made I cut the strips straight from the bottle, (after cutting the top off, of course) I had a whole ring, not requiring tape,  but keeping the cut straight was a challenge.  I then decided to cut the top off, cut straight down the length of the bottle and then cut the bottom off.  This gives you a "sheet" (that curls) that can be cut with a good paper cutter.

2. If you chose to cut strips and not ring then tape the ends together... (meet the ends together on the tape, then wrap around a couple of times)... this would be the time you could make it smaller if it is for a child.


3. Tie thread around the ring. ... do it away from the tape, that way you have the added strength of the string of pearls and it won't pull apart later.

4. Lay pearls onto ring and wrap thread around each pearl... I wrapped one time all the way around, then wrapped again going in the opposite direction.  I made a total of 4 wraps around.

4. Tie off end of thread... you can thread the thread in a needle and run it underneath the wrapped thread.

If you are like me, and you are not a huge lover of the cheap white pearls you can do a couple of things... buy brass pull chain, or a strand of rhinestones, or color your white pearls with a copic (type) pen.  The last option allows for ANY COLOR!


OH!  I made the tan and green bracelet from colored pearls and a thread pulled from a piece of burlap I had. (instant jute thread)


Wednesday, July 20, 2011

How to Makeover a $1.99 IKEA Clock

.
I bought it several months ago with the intention of replacing the face.  I finally did something this weekend.


This weekend I also "doodled" a prototype collage and decided to do the same to my clock.

1 - Take clock face cover off.
2 - Spread Yellow Pan Pastel over the entire face.
3 - Cut the flowers out of the patterned cardstock
4 - Added black and white checks to several flowers
5 -  Drew and cut girl
6 - Glued some flowers and the girl directly to the face...on top of the numbers... hummm....potential problem, but, its for me, and I know where the numbers are :-)
7 - Glued some flowers to the inside of the cover to add a 3-D effect
8 - Glued a couple flowers to the OUTSIDE of the clock for even more 3-D
9 - Put cover back on
10 DONE!

Friday, July 15, 2011

23 Saved This Week! So Far

.
Here are 4 of the 23 dogs we rescued this week!  


There were 4 adults and 19 were puppies from various moms... These four, plus one were in my lap for the whole trip...trying to make their way to my face!...I was holding my phone up over my head trying to get a picture...took lots but this is the only one that came out!  PRECIOUS! PRECIOUS puppies!!! 

We were actually one of two cars that went to a dog pound in a small town here in Georgia, loaded them all up and brought them to a rescue foster home here in Atlanta.  All were scheduled to die the very next day!!!  

I put so far in the title because we are picking up 1 or more tomorrow.  Actually, Andrea is the one doing all the work and paying for the gas...I just go along so there is someone available to love on the animal during the trip.

PLEASE! PLEASE don't buy a pet from anyone but a rescuer! (I think you have to pay for the "fixing")  There is probably ANY BRED you want out there being fostered and waiting for a full time home.  I know I was shocked when we transported a Pure bred Blood Hound! 

SAVE AN ANIMAL!!!  ADOPT.

Friday, July 1, 2011

How to Recycle a Plastic Bottle (Part 2)

.
About two months ago I saw a picture of some pretty glass bottles filled with lemonade in a tub of ice. It was just so pretty! Well, as is my practice, I went in search of said bottles...even though I'll never have a party where I need a bunch of bottles filled with lemonade! I found them and even ordered a sample...I'm actually looking at it as I type. The cost is about $2.50 each.  But, you know what? Why not just refill my Dr. Pepper bottle with lemonade?! If I do ever decide to need that.


Here you go: with vinyl red dots added :-)


The little collar was my attempt at doing something with the red ring that stays when you take the top off.  I made it thinking it would be a good wrapping "bow".  I then realized that it might fit around the neck of the bottle so I cut it and slipped it on... Make them in different colors and use them like wine glass charms (for water bottles!  People can know which is theirs!...Happy accident!


One more thing... I still needed to find something to do with the wrap so I made a quick, easy button / mirror/magnet


Don't forget to add your ideas HERE


Thursday, June 30, 2011

How to Recycle a Plastic Bottle (Part 1)

.
Years ago I worked as a Human Factors Engineer for AT&T.  The great thing about AT&T was that they had the best training and Human Factors Instructor in the country, Dr Robert Bailey, Dr. Bob to all who knew and loved him.  I LOVED THAT MAN!  He made learning fun!  One of the fun exercises we did was for the whole class to "Blue Sky" ways to use a, then glass, soda bottle.  No rules.  We came up with over 100 ways!

Yesterday I had an idea I was looking at my empty Dr. Pepper bottle thinking about how I could use it and I decided to let you in on the fun.  I would like your help in "Blue Skying" ways to use ALL PARTS of a plastic drink bottle.  You can either comment your idea, or, if you have seen it or blogged it, please, add to the Link Tool  ... see the button in the top tool bar "Recycle Bottle"... please use that screen to add your ideas or great finds.  I will leave that link so you can find it, or you can save a link... I'm hoping to have lots of participation.  If you think of something to make and you blog it PLEASE add a link.  I have already added a few...and will add the following soon. 


 Be sure and think about EVERY PART of the bottle


Here is one of my ideas...(more to come):

- My favorite...because I am feeling SO CLEVER about this... My "Marker Shelf"!


Pin It
Everyone knows that you should always store your double ended markers horizontally so that the ink doesn't all rush to one end.  That is usually a challenge, for me anyway... I have tried many different ways but as my marker collection grew I was running out of ideas... Until yesterday when I saw a bottle that I had cut the top off of for a different project laying at my feet.  EUREKA!!!  IDEA!  Hook several together, one for each color group!  


At first I thought I would punch holes and brad them together...that would work...BUT, I saw the plastic thingy that holds them together when you buy them... and it has a handle!  So, I loaded them all back into the plastic thingy and now I can carry it from place to place!


And if I decide to stand them up while I'm using them I can do that too!

The plan is, to add even more when I get more empties (thankfully I hadn't taken the trash out and was able to dig these out!)... I'll do that by adding another holder thingy...linking it to the top row of  this set giving me 3 holes to add another layer...all attached to each other!  Oh yea, I'm so clever!

added 7/20/2011
My shelves are now 3 high and 4 across! ...  with no end in sight!  I still need a "cubby hole" for scissors, rulers, and (TBD) , and, and,  and my EVER DISAPPEARING remote control! ... (because it sits on my coffee table in front of the tv :-)  And yes, it is still portable...

TIP: If you try this it is important to cut the bottle in the right place...The bottles I used have a larger bottom and top... be sure and cut about an inch above where the bottle gets smaller. You want both ends to be the same diameter when lying down so your markers won't fall out!  (guess how I figured that one out:-)

DON'T FORGET...click on the link in the top tool bar to see more ideas, and PLEASE ADD YOUR OWN...or some you have found on the internet!


OH!  And I would LOVE IT if you would spread the word...let's have us a HUGE "Linky" Party!


ThriftyThurs Thrifty Thursday Week 36

Tuesday, June 28, 2011

Today Was Mark's Birthday

.
I use to work for Mark.  He is the Minister of Music at a church here in Atlanta and today was his birthday.  I have actually stopped caring about such things but when I saw this on Pinterest ... pinned from here on the internet I knew I had to make one for him!


There are lots of folks in the choir and trust me, with lots of folks comes lots of complaints....sooooo today I went and bought a piece of wood, and made this one... my $3 version :-) :


It would have cost less but that is one BIG DADDY RAT trap!  It was $2!

OH!  I made the target button, that didn't come with the rat trap! And,  the trap is set but it is wired down so it doesn't break anyone's hand!  You can see the little green wire right under the M.  My loaf of bread is now tied in a knot... the sacrifices we make for our art....

I think I like their's better but I wasn't too sure how Mark would like it...he's not the "country" type.

Now see the fun ideas you miss if you aren't "pinning"?

PS.... I woke up at about 3:30 and I have been putzing around here and FINALLY FINALLY figured out how to show a list of the doodles I have so far with one click of the button!!!  YES!!!  

Please notice that I have added a tab at the top called "My Doodles", that is actually a link to my other blog "Polly-Wolly Doodle" but as the link I use this: www.polly-wollydoodle.blogspot.com/view/snapshot .   THAT shows you a snapshot of all pictures on the blog without having to scroll through every single post!!!  You remember, I mentioned that function a few blogs back.  I am leaving the other link in the right column because that shows when the last picture was added.

Go check it out... see how it works, and you will also see that I added a lot of posts from a DIFFERENT blog that I did last year...all those pictures were done using the mouse and PC to draw!

I know, I know, you probably couldn't care less about my doodles but I'm just proud I figured it out! Here in the middle of the night!  Actually, it is almost 6am now so not middle anymore!  

I'm off to try and sleep again!


Monday, June 27, 2011

..................... HEAR YE!...... HEAR YE! ..................... I Have Created a NEW TT Font!!!

.
.
All are "see through" so you can make other items appear to be behind the letters. Or, said another way...where you see white, it is actually transparent

IMPORTANT NOTE!  This font looks better the bigger you make it.  I usually start at 150 points and work up.


Please add a link below, to your blog, showing how you have used Polly Wolly Doodle!  We all want to see what you did!  THANKS!  The link is good for several years, so please remember to come back anytime, it will still be open.

There is currently a "bug" on Linky Tools... Please choose to "Crop it Yourself" when given the option.  If you use "Autocrop" you might get a message saying it didn't work... but it probably did.  ANNOYING bug!

Saturday, June 25, 2011

Fun EBAY Finds

.
First, I'm not really an Ebay shopper... mainly because I have made some pretty big mistakes in the past and realized I can't be trusted! 


You see, I have this "I WANT IT NOW" problem and having to wait 5+ days to find out if I "won" something makes me a little crazy. This was evidenced when I bought TWO, countem, TWO heavy duty paper cutters (both over $300 each!!!)...because I bid on one then find another closing sooner so I bid on it too. OH MERCY! Thankfully, I found someone willing to buy the second one right away. (THANK YOU JESUS!). 


Then there was a time that I paid more in bidding than they were selling the item for on their online store! NOT happy about that!


Anywaaaay, I decided to chance it again last week and I just got what I "won" yesterday and today.


First thing... I bid on 72 Marvy LePlume II Markers or a grouping of 6 12 marker packs ...
only 5 shown because I left one in the box and didn't realize it


at Micheal's each pack is $21 so the 6 packets would be $126+ I won the bid for $43+ $5 shipping. YES!!! A GREAT DEAL! (even with a 40% coupon)


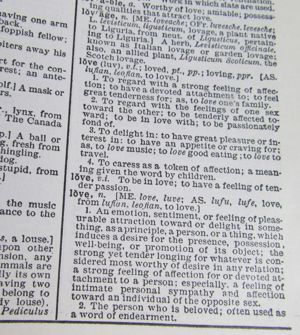
Then today I got a really huge surprise! I got my second "won" item.  ... an old Webster's Dictionary.    I found out that there are some auctions that let you "Make Your Best Offer"!!  I did not know you could do that!  So, I gave it a try.  There was a Webster's Dictionary listed at a "Buy It Now" price of $15 so I offered $10 and they accepted it.  I have no clue if I got a good price or not, I just know that I am THRILLED with it!  That puppy is a MONSTER!


It has 1000+ pages and was published in 1952!  What fun!  That makes it 58 years old!  YES!!!
And it came with someone's memories:


You want to see the definition of "Love" in 1952?  I wonder if its different now??  I don't really care what it is now... I like everything about "Love" better back then I think.... 


VERY COOL!  HAPPY HAPPY DAY!


Do you want a picture of a word defined???  Just ask in the comments and I'll take one for you. :-)


Wednesday, June 22, 2011

Word Search Cards

.
I have a FREEBIE for you today.  It is a single print with two different cards on it.  They are pretty much the same but one is a "Thank You" Word Search and the other is for a "Birthday" Word Search.  You have the choice of either finding and circling the words yourself or leave them for the receiver to find.


Your file is slightly different because my PC crashed before I could get the one I printed saved! AND, I couldn't find the actual software I used to create it again, I had to use a different one.  You can do a
"Right Click/Save Image As" to get the following.


OR, just use this one and create your own list because the ones I did may not fit your needs.  


This is the list of all words that can actually be found:

Happy Birthday


You are the best


I love you
Thanks So MuchCongratulationsHappy New Year
Thank YouOver the HillWish You Were Here
I Miss YouTo Infinity and BeyondI Love You Too Much
I Love You More

OR, go HERE and create your own.

Enjoy!

OH!  and this week's favorite from "The Voice"


But, I WANT it!


MAN!  I have been trying to load these pictures ALL DAY but Blogger has been down!!!  But, all is good again so YAY!


OK, one of the bad things about Pinterest is that you see things that you never knew you just HAD to have!  It is THE missing thing in your life (just kidding, but I do come away wanting lots of things)  I have already gotten a sugar cookie stamper, and a Popsicle maker and a Mini-Moon Pie maker.... And today's gotta have is this:


Glitter (salt) shakers! YES I WANT IT!!!


The idea originally came from Crafty Storage.com .  Heck, just the name of that site makes me want to spend hours there!  It is one that we all need to "follow"....I know I am now.  Anyway, Shirley got it from Targets and naturally, when I did an online search for it, they didn't show it listed.  BUT, I was able to find this one at Amazon....close enough.  


grocery store today...geeeesh.... need I say more?   And that's why we have wish lists, right?AND I WANT IT!!!  Well, several actually because I LOVE GLITTER and have tons of colors that need their own little shaker :-)  ... but, this one will have to go onto a Wishlist for the future... I went to the g


another thing I think is too clever...why didn't I think of these?! Sold at 2 Peas in a Bucket... but any charm will work!


Sunday, June 19, 2011

All about Dynamic Views for Readers - Blogger Help

.
Did you know that you can now view most Blogger blogs in a different way? FASTER...there are 5 different ways I think my favorite is using the snapshot view. To see my Polly-Wolly Doodle site using snapshot, click HERE.  You will see all the images on the site, if you see something you want to know about you can click the picture and go to it.  LOVE this feature because I can spend HOURS going page by page looking for something interesting!


Basically, you just add "/view/flipcard to the URL for any blogger site... so for THIS blog you would put


www.nancybabb-classes.blogspot.com/view/snapshot


You can learn all about it on this link


Get a playlist! Standalone player Get Ringtones